Purple Polish and Golden Wisps

Showing off my eggplant and gold colored nails.

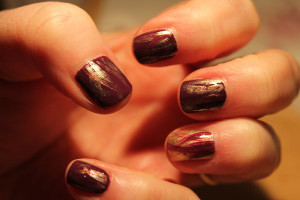
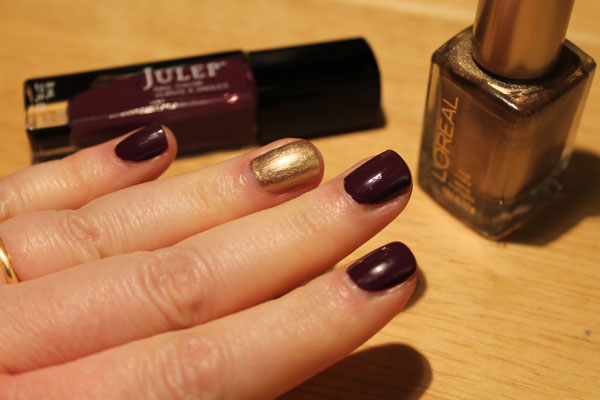
This week’s manicure was inspired by Jen at PolishAholic although it really looks nothing like hers at this point. Jen created a left to right ombre effect with her purple polishes and while I love purple, apparently I do not like it enough to buy them all in coordiating tones (at least not yet). So I decided to use the new Julep eggplant purple nail polish accented with a gold by L’oreal (#580). Here is my final inspiration:

I started with purple on four nails and gold on ring finger.

While it doesn’t look as elegant as Jen’s I quite like it. I would like to try it again with a thinner brush and without the gold accent nail; although I do like the combination without the wisps (above).

Showing off my eggplant and gold colored nails.

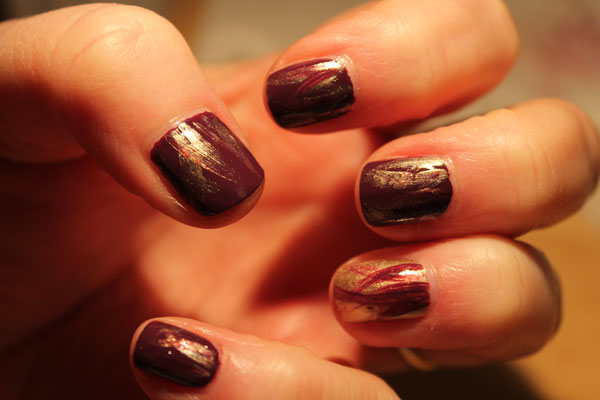
Dark eggplant is a wonderful nail color for this fall and gold dresses it up. Do you have any favorite purples in your nail stash you could dress up with some gold accents?

***
Topic Links
* Check out Jen’s original nail art design that inspired me
* Pick up the eggplant nail polish from Julep

Puzzled Nail Art

Cover Girl Pink-finity nail polish.

I follow a lot of nail art bloggers for fun and inspiration. The inspiration part came in when I decided I wanted to kick my three year spurt of picking at my nails and cuticles until they were raw habit. I used looking at the lovely cuticles of others and it worked. My cuticles are looking pretty damn good. I have not ventured much into the world of nail art myself though I have wanted to. The basic wearing a new color on the ring finger (which is fun too) is pretty and the lady bug art I did years ago are the extent of my experience.

Anyway, I have been really admiring puzzle pieces. There are more than a few variations on Youtube. My first attempt involved creating a white outline but it was a really messy process which I did not take pictures. I decided to go with a simpler technique offered by Jocelyn from Polishpedia. She makes it looks so easy.

Let me tell you, it is not! Ok, it is not super hard either but it is not as easy as it looks in the video. Speaking of video, you can watch her instructions:

My Puzzle Pieces Nail Art

I loved the pale color of Cover Girl’s Pink-finity (#140) but after a few days I was itching to put some nail art on it.

Cover Girl Pink-finity nail polish.

My original plan was to coordinate it with Julep’s Alley, which is a bright sparkly blue, but I ended up grabbing the Lena, a creamy teal, instead. The color blocking still look great together but you know what it is like when you have your heart set on something.

In the video the nail artist put the tape on all her nails first. I chose to do one at a time because knowing me the tape from one nail would accidentally touch the wet polish of another. I also reused the tape one more time (that is the recycler in me) as you can see from the third image. I did all the boxes on both hands and allowed them to dry before I went on to make the dots with my dotting tool. I then did all the blue dots first, followed by the pink ones. A top coat is a must to smooth things out. It will still be a little bumpy where the puzzle pieces join and takes a bit longer to dry.

Step by Step images of nail art for puzzle pieces.

Ok, it is not hideous by any means. There were many spots I would have done over because they smudged or the circle was more of an oval. I do think it is a good first attempt (this style). I especially like how the thumb one turned out.

Two color nail art puzzle pieces.

A few things I have learned from this experience:

  • Patience is required for nail art.
  • Make sure there is enough light.
  • Start with weak hand first (I already knew that but ignored it anyway).
  • Don’t rush — make sure you don’t have to be somewhere in an hour.
  • Don’t load up the brush with polish.
  • Practice may not be perfect but it does make it better.
  • Have different sized dotting tools on hand. My tool was too small.

Overall, I did enjoy doing this and want to do it again with different colors. I would recommend giving it a try if you have the time and are feeling creative. It is fun watching it come together.

***
Topic Links
* Subscribe to Polishpedia for more nail art ideas
* Check out my lady bug nail art tutorial