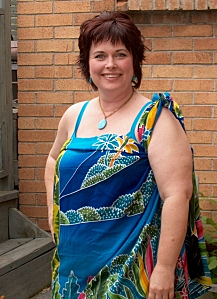
The Chest Tie
 This is probably the most common and the easiest way to tie a sarong. And quite frankly it’s my favourite. It just seems to hang right on everyone.
Directions: Grab two adjacent corners on one of the longest sides. Wrap around your back and tie a double knot in front above your cleavage.
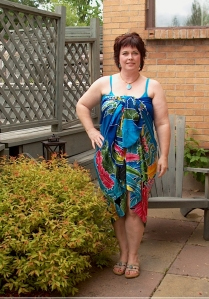
Waist Tie, Long and Short Versions
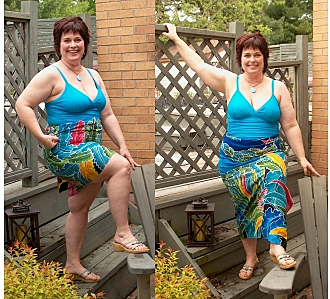 This one looks like a tank and long skirt. It makes an acceptable touristy outfit if you’ll be in a coastal region and tempted to get your toes wet throughout the day.
Directions: Hold the sarong at your back by the two corners on the longest side. Keep one corner stationary at your right hip while you wrap the sarong around yourself. If the two ends meet tie them together and tuck in the ends or tuck in both ends and slightly roll top into a cuff securing both ends. The short one is basically the same except you fold the sarong in half to create a short skirt. The seam you create while folded goes at your waist.
Cross Over Tie
 The crossover is not one of my favourites but some people love it and wear it well. It can be worn as a dress with no bathing suit underneath; but frankly, I don’t trust my knot tying to be that brave.
Directions: Cross over two corners in front of you and double knot in back of neck.
Shoulder Tie
 The shoulder tie creates a unique look with a sturdy tie that has the added advantage of extra security provided by the crease of your armpit.
Directions: Same cross over as above but instead of tying it around your neck slide it around until it’s under your arm and then tie a double knot over your shoulder.
The sarong used in this article was provided by Feedora Plus Sarongs in Hawaii. Their plus size sarongs are a generous 45 inches X 90 inches.
Originally published 2/16/2007 at Large & Lovely, BellaOnline. Updated September 20, 2014.
]]>From the time they sent it until now I’ve had a few trips and decided to take it along with me. The first thing I noticed when I took it out of the package is how pretty the tube is.
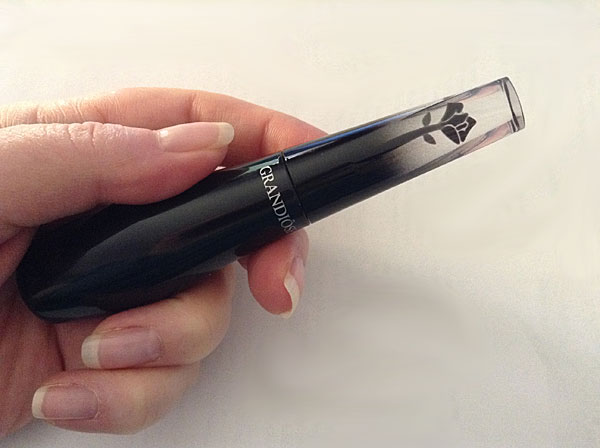
In fact, I think this is probably the prettiest tube of mascara I have ever had my hands on. It feels good in my hands too.
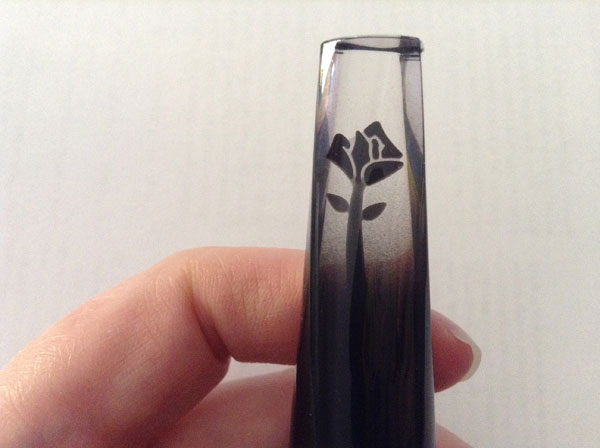
The weirdness happened when I uncapped the lid and pulled out the “Swan-Neck”wand. I have to admit it took me a few days to get a feel for the bend in the wand so I could apply the mascara properly. Now that I have, I quite like the bent wand. I have noticed I don’t have to contort my face as much to apply the mascara.
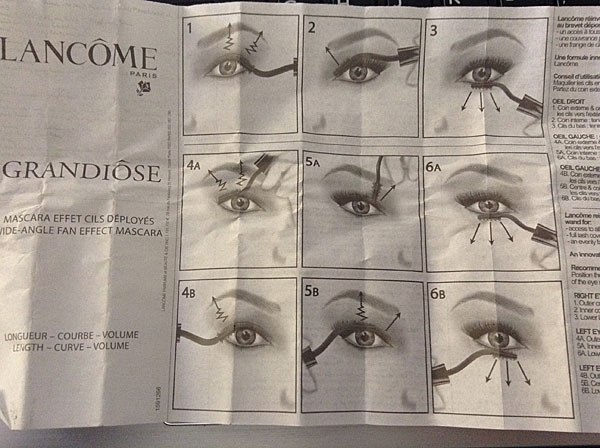
The box even comes with fold out instructions on how to apply.
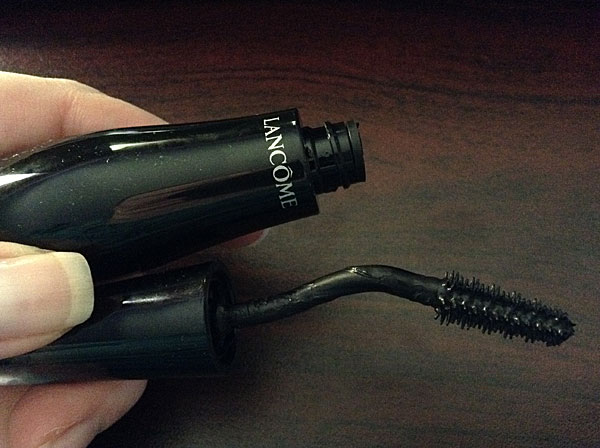
The tasks of this formula are to add length, curve, and volume. The color they sent was Noir Mirifique (01) and it really is a wonderful bright black. I like my brushes a bit short and not too fluffy as I find it easier to apply without making a mess but with this brush I found I couldn’t get the lashes to separate as much as I wanted. I’m not sure why — it could be the bristles are a wee bit too thick.
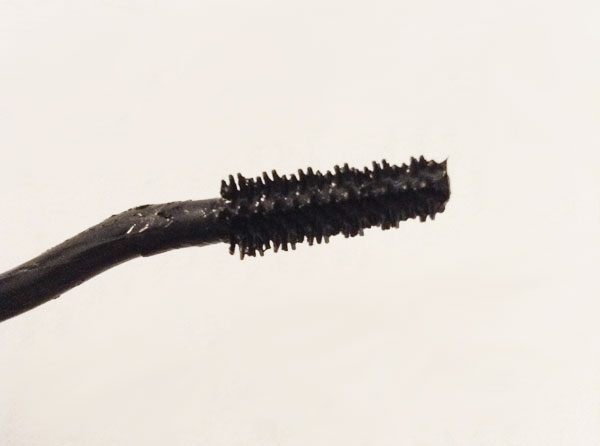
The formula is also very thick. For me, I felt one coat was fine. What you see in the picture below is actually more like 1 1/2 than two coats as two tended to look messy to me whenever I tried it.
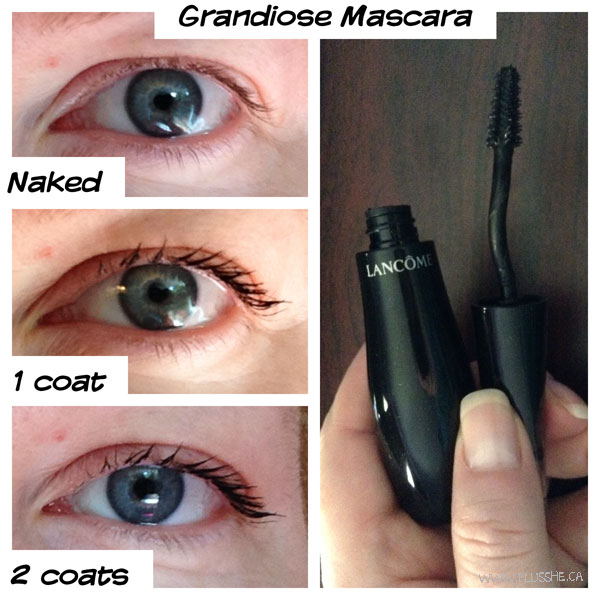
As for wear, I have no complaints in that department. The mascara stayed on all day and didn’t flake at all (a common problem I have even with mascaras that insist they don’t).
Overall it was an OK experience but not the exceptional I expected from a $35 tube. I can’t say I loved it enough to get another.
]]>One of the first things I like about these press on nails is the length. They are short and very workable. I am wearing them as I am typing right now with no issue whatsoever. The downside is my nails are not very long to begin with and I had to trim them a bit.
The whole process takes five to ten minutes: sorting proper sizes, cleaning off own nails with prep pad, and applying nails. They recommend not washing your hands for 30 minutes but otherwise you are ready to go. No messy glue involved! Here is a 30 second image video so you can see process from start to finish:
From the top and from a normal distance (not looking too closely) they look like regular nails but on closer inspection from the side or underneath it is obvious they are fake nails especially if you haven’t trimmed your nails short enough. There are 24 nails pieces to choose from but I still found it hard to fit my thumb and middle fingers.
I find it necessary to give the nails a good press every day just to make sure nothing has come loose — usually after a shower. I also give them a quick blow dry with the dryer so water is not sitting underneath them.
You definitely don’t have to worry about chipped nails or questionable chemicals with this brand of nail coverage and the sticky backing is pretty strong. I can get about five days of problem free wear but I like to change my color more often so some people might be able to get longer. The key is definitely clean nails, and making a point of repressing them at least once a day.
A box of nails cost between $9 to $13 depending on where you purchase them. They are available from shops like Walmart, Target, London Drugs, Loblaws etc.
***
Topic Links
* Learn more about Influenster
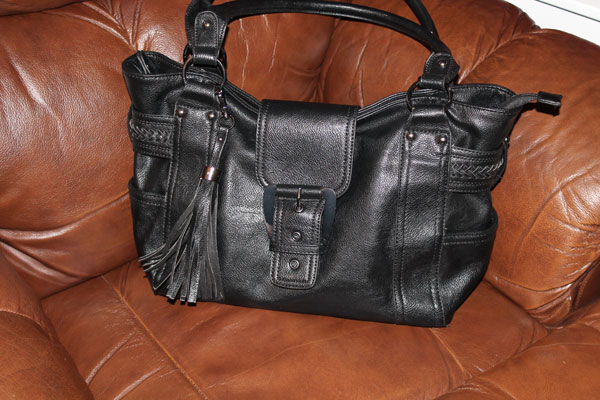
The first bag which I have put all my stuff into for the winter is the Elaine. It is a black textured bag with some nice detailing. I haven’t had a black handbag in some time so I was really looking forward to this one arriving. Here is what the bag looks empty — somewhat sturdy shape.
I love the extra long handles for slipping over my shoulder and the braiding on the side is pretty.
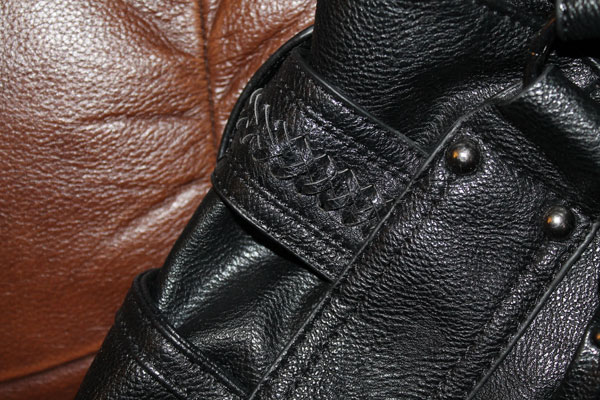
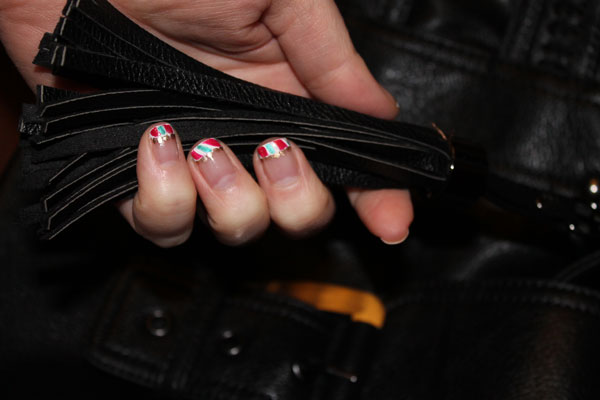
There is a fringe tassle that can be left in place or used for keys. I usually just leave them in place as is.
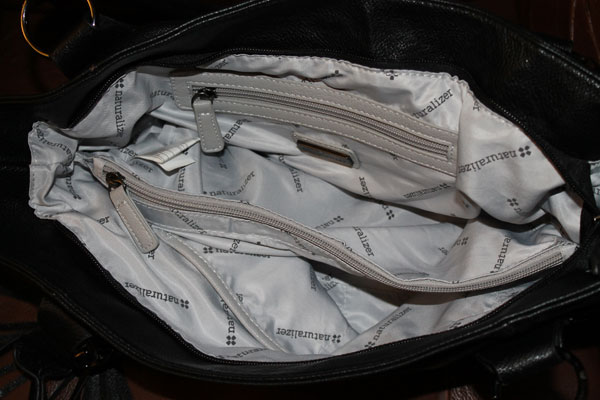
There is lots of space inside with two main compartments and a zipped center pocket that is quite large. There is the traditional zipped pocket on the backside and a few smaller pockets on the opposite side for phone etc. The inner fabric was not pretty which was disappointing. A little on the rough side too.
There is lots of room and it fit all my stuff.
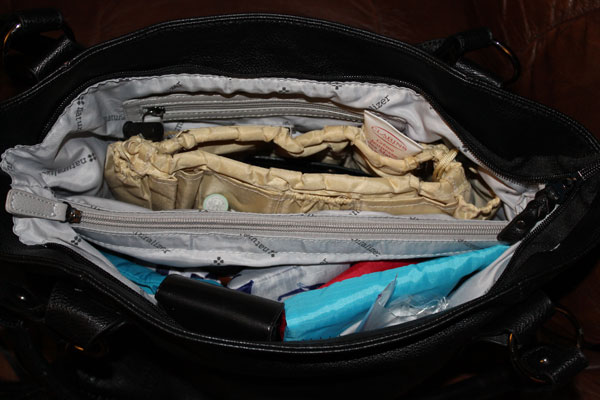
And my bag is now all full and ready to go.
The second bag was the Shapely in taupe and black. I thought it looked a bit dressier than an average day bag with the color blocking and I liked it was still neutral.
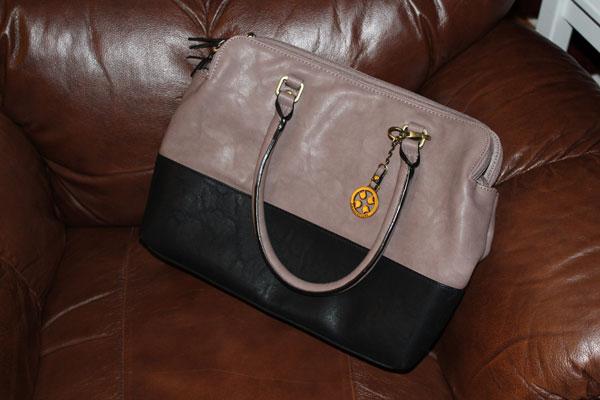
In terms of workmanship I am perfectly happy with the outside of both bags. But the inside lining was disappointing especially in the Shapely bag.
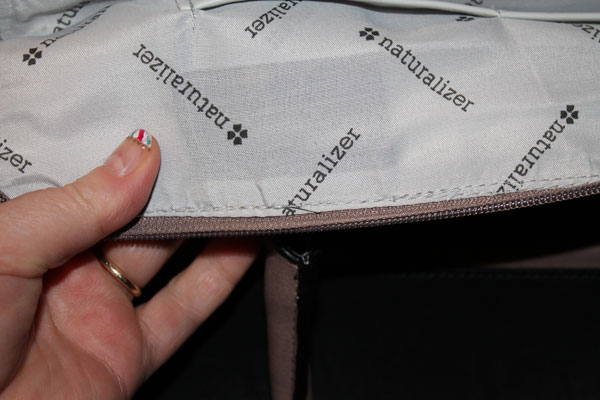
In my opinion the lining should be thick enough that you can’t see the purse parts and so crumbs or whatnot cannot work their way between the lining and material of handbag. If I had paid the $85 price tag for this bag I would have been incredibly disappointed. If costs are at a premium then I can definitely do without things like fringe keychains to get a better lining.
***
Topic Links
* Get your next handbag from Naturalizer
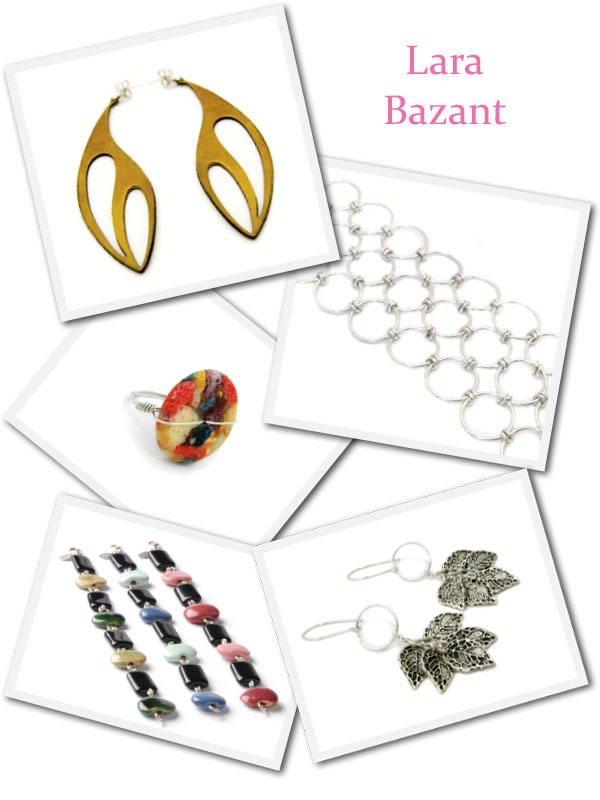
From left to right:
- Brass Wing Earrings, $49
- Chainmaille Cuff Bracelet, $179
- Pressed Glass Ring, $29
- Kazuri Bracelet, $49
- Cluster Leaf Earrings, $49
Lara Bazant ships throughout Canada and almost anywhere internationally.
***
Topic Links
* Get your eco friendly jewelry from Lara Bazant
The first look is called Pop Brights. The look was developed by Jenny Stencel and Danielle Black from polishyoupretty.com. Here is their tutorial:
I thought this look would be a good one to start with so I headed out to Shopper’s to see what I could find. Luckily they had all the colors I needed and they were all on sale:
- Quo by Orly — Femme Fatale
- Ceramic Glaze — Watermelon Cooler
- Ceramic Glaze — Exotic Dragon Fruit
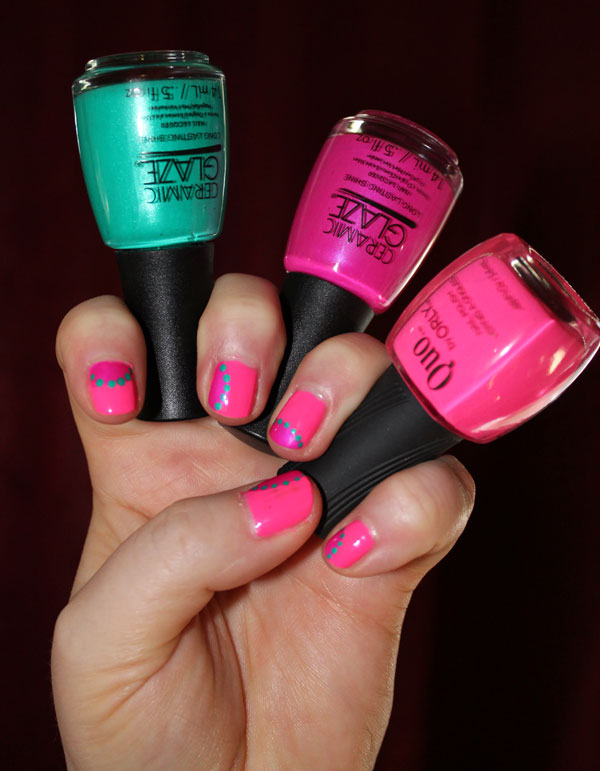
This is my first time using Quo and Ceramic Glaze nail polish. They are both on the higher end price wise and were on sale for $8.99.
I did not enjoy the Quo experience. I actually had to take off the first two coats I put on because they were such a goopy mess. If I used anymore than two brush strokes to get the polish on it got sticky. I fared better with my second attempt but still was not impressed. If they are all like this I probably would not buy anymore.
I did however really like both of the Ceramic Glaze polishes which I found much easier to work with.
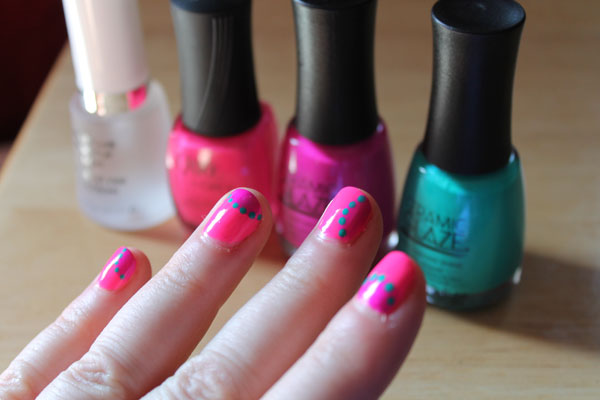
The video used an Essie Millionales base coat but I used a Revlon Multi-care Base/Top Coat (965). And my favorite Julep Freedom Polymer for the top coat.
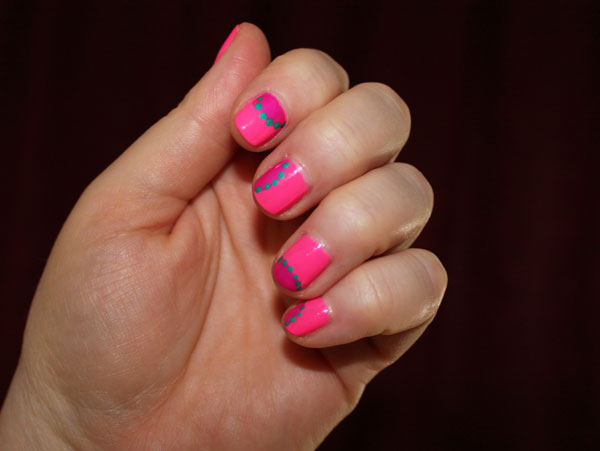
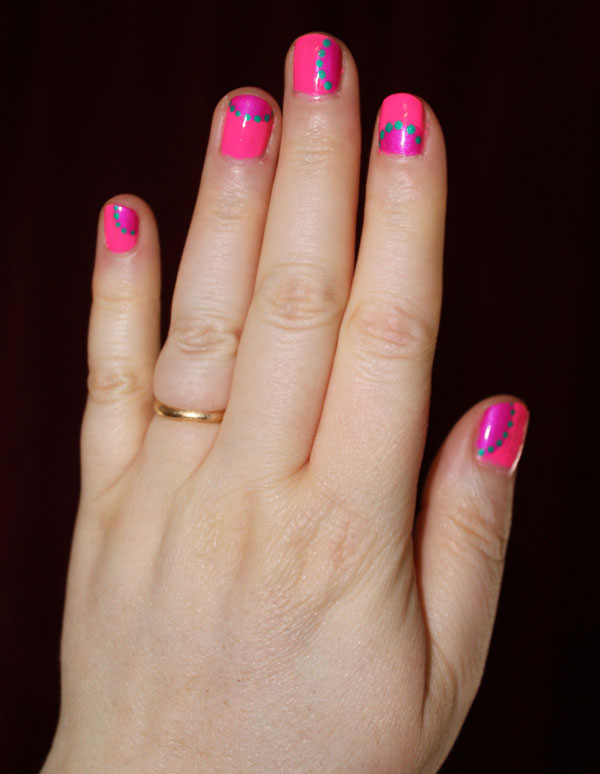
I am very happy with how it turned out! I have a lot of brighter shades in my nail polish box and I love the concept of breaking up the brightness so it is not so overpowering. I am so thankful I watched this tutorial and gave it a try. Fingers crossed the judges think I “nailed the look”!
***
Topic Links
* Shopper’s Drug Mart Nail the Look — Campaign is over.
* Take a look at my other entry!
I know I have been going crazy with nail polish for the last few months and I apologize for this addiction but honestly I cannot help it. Ok, I can but I don’t want to. Especially after wearing this new color from Julep.
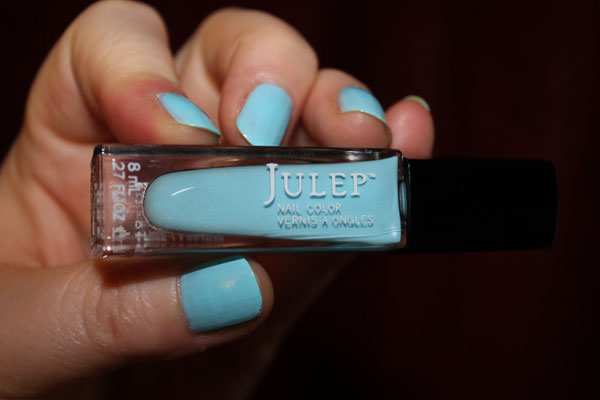
About a week ago I put on two coats of this thick creme nail polish with no top coat — it had such a nice sheen on its own I didn’t bother.
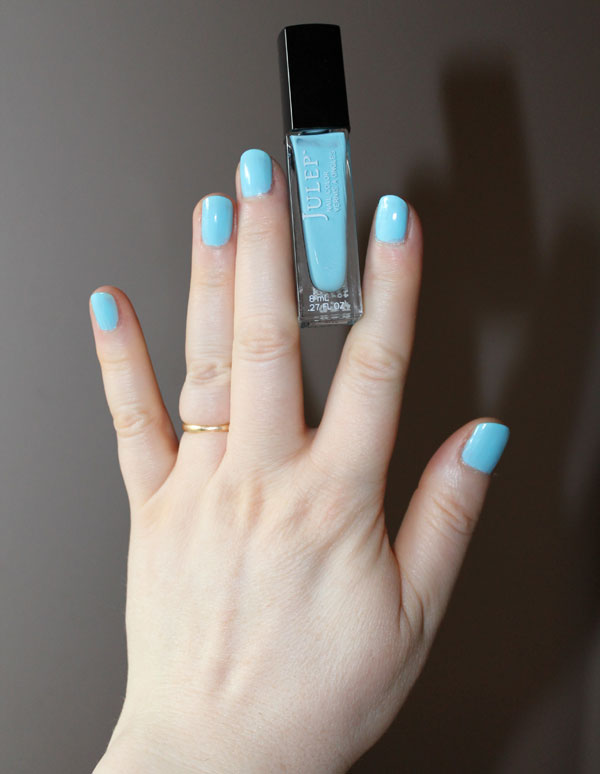
I probably could have put on a third coat as my nail tips are still visible but I really don’t mind the look. This robin’s egg blue is called Bess — like a good friend. I know I am obsessed with blue tones but this one is so pretty.
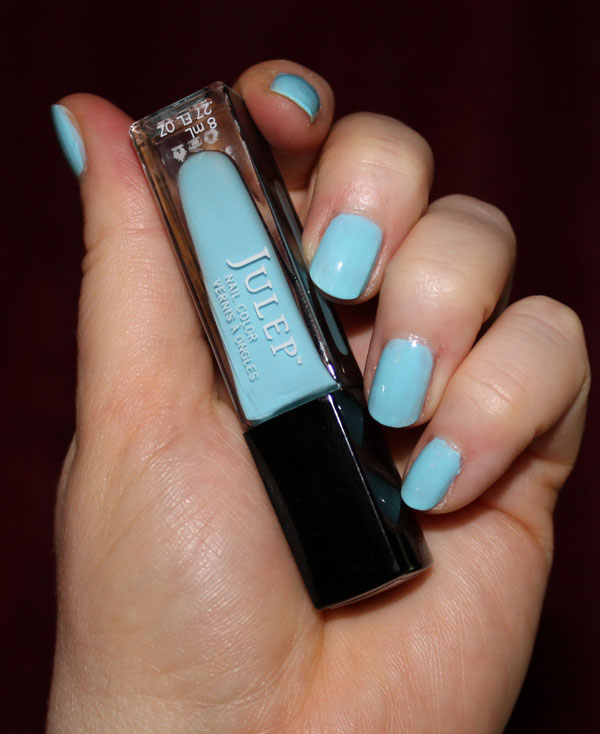
After a few days I was a wee bit bored with myself and changed the look into a make-shift French manicure by putting slate sparkle polish (Jordan) on the tips. I am pretty sure it was two coats. It just looks black in the photo but trust me, it is glitter.
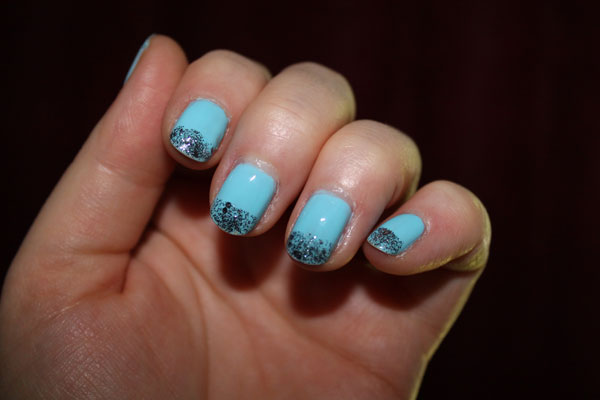
I enjoyed it for a few days and was itching to do something else. The polish was still looking hot so I could not justify taking it off. Soooo… I put on another coat of Bess, yes, right over the sparkles and everything. Then I took out my L.A. Colors white nail art lacquer brush and painted diagonal stripes on the tips (left hand first).
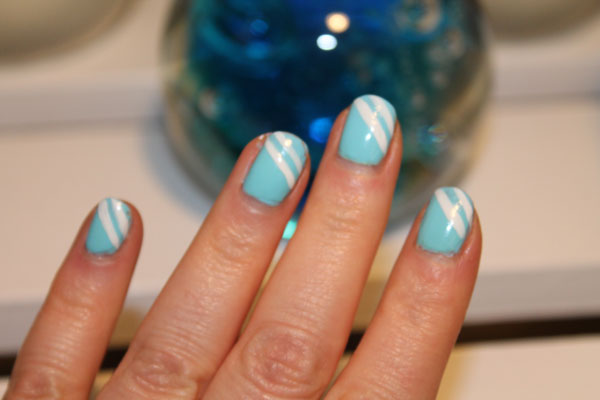
It turned out way better than I could have imagined.
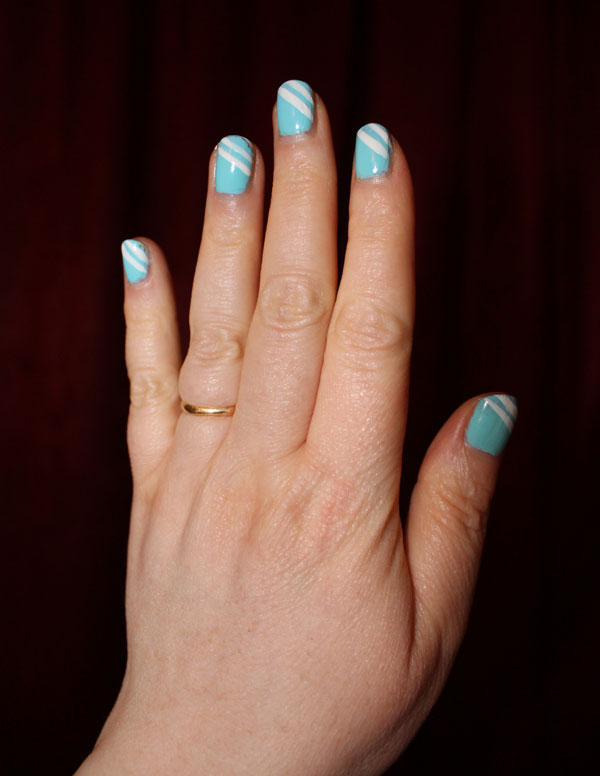
This last nail art was super easy and I highly recommend trying it. It was fun to do and looks so sharp.
***
Topic Links
* Become a Julep Maven or shop at Julep
* My first Maven experience
* My second Maven experience
Plus size personality, Marcy Guevara takes us on a visual tour of some of Cacique’s pretty and functional bras as well as offering tips on how to get a proper fit and style for your outfit.
I think I have mentioned before that the Balconette style is my favorite for every day where. And Cacique was the first brand I fell in love with. Most of my pretty bras are Cacique. Here are a few of my faves from their new arrivals:
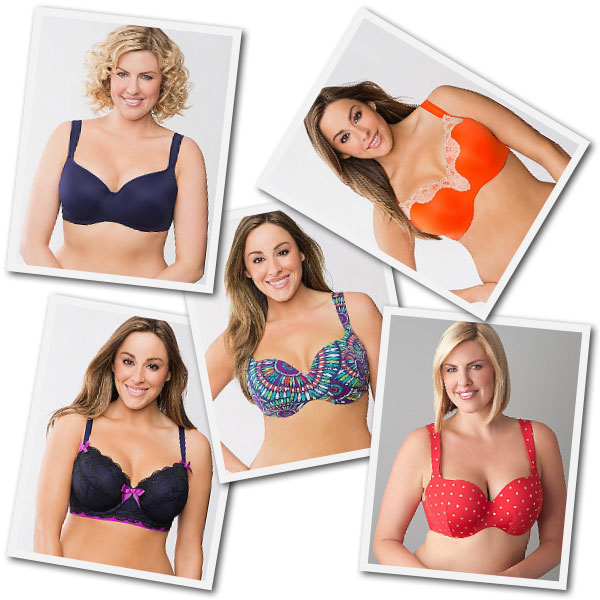
As of this post Lane Bryant currently has bras, Buy 1 get one 50% off as well as some on for $20. Have fun!
***
Topic Links
* Visit Lane Bryant for plus size clothing
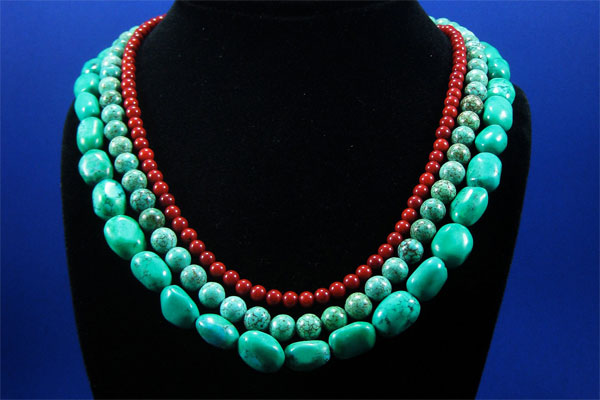
The jewelry artisan, Eleanor Brett Lewis-Deweese, combined bamboo coral and turquoise colored beads to make this three strand necklace available on her Etsy shop for $135.
***
Topic Links
* Get your turquoise and red statement necklace from Etsy
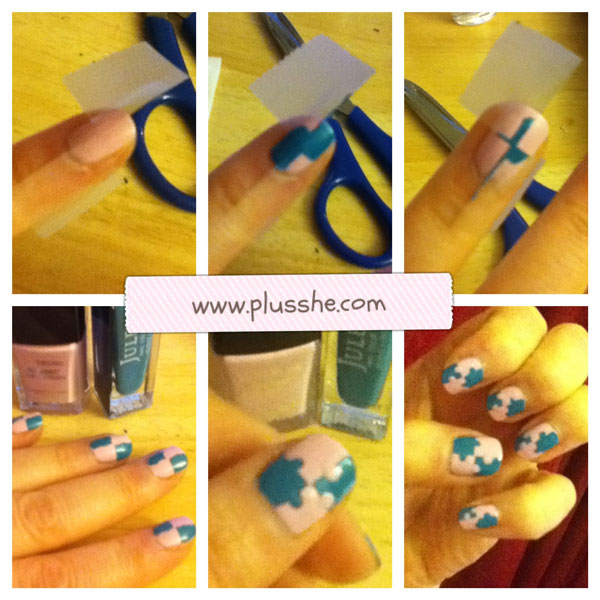
Anyway, I have been really admiring puzzle pieces. There are more than a few variations on Youtube. My first attempt involved creating a white outline but it was a really messy process which I did not take pictures. I decided to go with a simpler technique offered by Jocelyn from Polishpedia. She makes it looks so easy.
Let me tell you, it is not! Ok, it is not super hard either but it is not as easy as it looks in the video. Speaking of video, you can watch her instructions:
My Puzzle Pieces Nail Art
I loved the pale color of Cover Girl’s Pink-finity (#140) but after a few days I was itching to put some nail art on it.
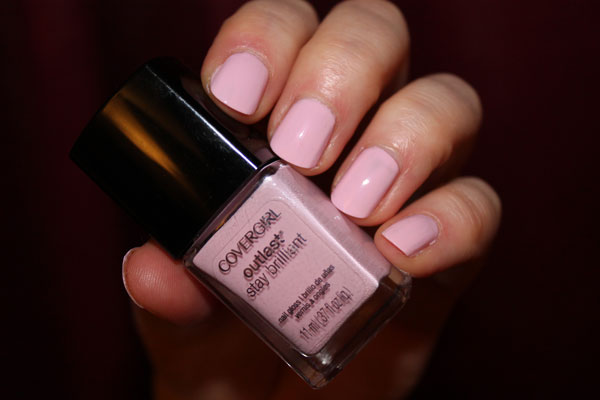
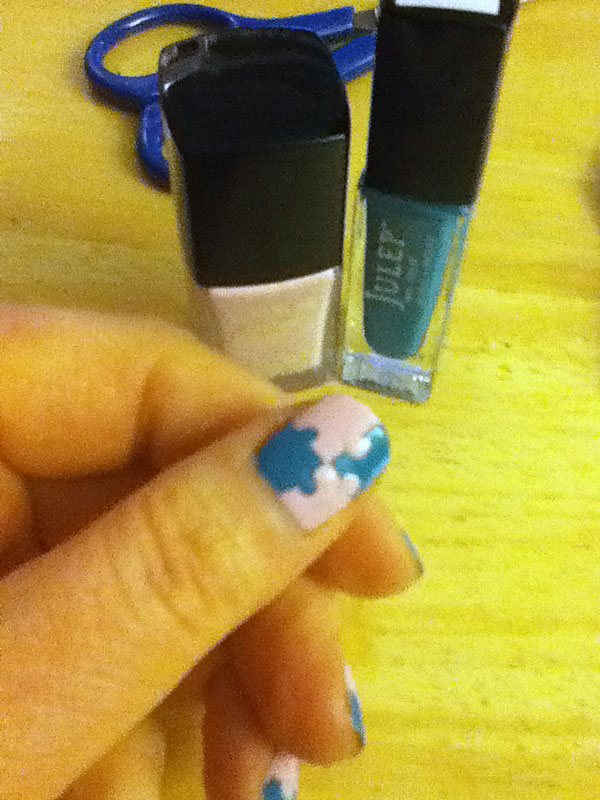
My original plan was to coordinate it with Julep’s Alley, which is a bright sparkly blue, but I ended up grabbing the Lena, a creamy teal, instead. The color blocking still look great together but you know what it is like when you have your heart set on something.
In the video the nail artist put the tape on all her nails first. I chose to do one at a time because knowing me the tape from one nail would accidentally touch the wet polish of another. I also reused the tape one more time (that is the recycler in me) as you can see from the third image. I did all the boxes on both hands and allowed them to dry before I went on to make the dots with my dotting tool. I then did all the blue dots first, followed by the pink ones. A top coat is a must to smooth things out. It will still be a little bumpy where the puzzle pieces join and takes a bit longer to dry.
Ok, it is not hideous by any means. There were many spots I would have done over because they smudged or the circle was more of an oval. I do think it is a good first attempt (this style). I especially like how the thumb one turned out.
A few things I have learned from this experience:
- Patience is required for nail art.
- Make sure there is enough light.
- Start with weak hand first (I already knew that but ignored it anyway).
- Don’t rush — make sure you don’t have to be somewhere in an hour.
- Don’t load up the brush with polish.
- Practice may not be perfect but it does make it better.
- Have different sized dotting tools on hand. My tool was too small.
Overall, I did enjoy doing this and want to do it again with different colors. I would recommend giving it a try if you have the time and are feeling creative. It is fun watching it come together.
***
Topic Links
* Subscribe to Polishpedia for more nail art ideas
* Check out my lady bug nail art tutorial